Part 1: Create a Contour Drawing of Marlowe
Supplies: tracing paper, HB graphite pencil, ruler
My first goals are to outline a drawing space on tracing paper, add a line of symmetry, and draw one side of Marlowe’s head.
Step 1: Press gently with an HB pencil to outline a 9 by 12 in drawing space (the size of the canvas I plan to use) on tracing paper. Draw a line of symmetry down the center of the drawing space.
Step 2: Outline half of Marlowe’s head on one side of the line of symmetry.

Step 3: Place a sheet of tracing paper over your outline of half of Marlowe’s head. Tape the tracing paper in place. Trace over both the line of symmetry and your outline drawing with a 6B pencil.
Step 4: Flip the drawing (on tracing paper) over to the other side with the graphite side down and tape in place. Line up this half of the drawing along the line of symmetry. Trace over the outline again to transfer the other half of the cat onto your drawing paper.

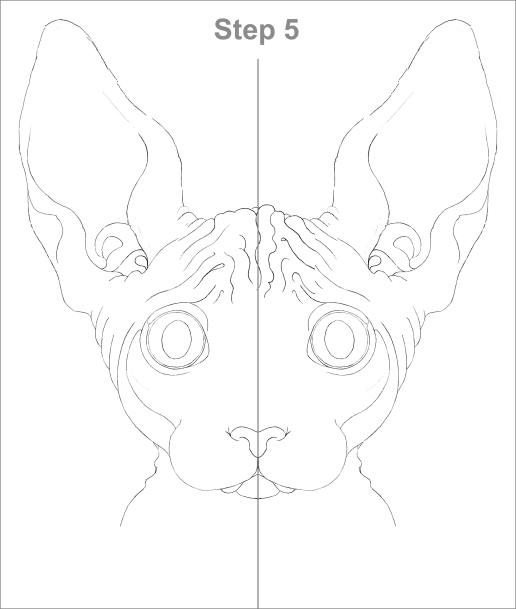
Step 5: Remove the tracing paper and you have a symmetrical drawing of Marlowe. Touch up any sections that didn’t transfer accurately.

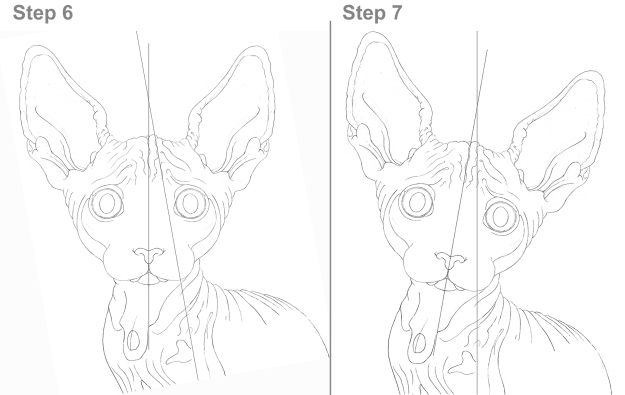
Step 6: Complete the drawing of Marlowe by adding her neck, body, and additional details. These outlines serve as guides for painting each part of him in the correct place on the canvas.
Step 7: Rotate your drawing slightly toward the right. She looks so much cuter with her head tilted to one side. Check over your drawing from top to bottom and erase/redraw any sections that you’re not happy with.

Part 2: Getting Ready to Paint
Refer to the following step-by-step instructions to transfer a drawing to a canvas:
Supplies: your drawing, 9 in by 12 in stretched canvas (or canvas board), Scotch tape, 6B and HB graphite pencils, pencil sharpener, spray fixative.
- Compare your drawing to mine (below) and make any changes if needed. Note that the first line of symmetry was erased.
- Turn your drawing upside down on a smooth surface and sharpen a 6B pencil.
- Make a stencil: hold the pencil at an angle and shade in the backside of the paper wherever the outlines are. Make sure all your outlines are covered with graphite by holding the drawing in front of a bright light.
- Use a facial tissue or paper towel to very gently blend the graphite. You need to leave enough graphite on the reverse side to transfer the drawing to a canvas.
- Position the drawing right side up on the canvas (the coating of graphite is on its reverse side). Tape the drawing securely in place along one side so it can’t accidentally move.
- Use a sharpened HB pencil to trace over all sections of your drawing. Before you remove the tape, lift the tracing paper to confirm everything transferred.
- Spray the canvas with two or three coats of a fixative so the graphite won’t eventually bleed through the paint.

Part 3: Mix Colors and Paint a Background
Only six colors (plus white to lighten a color’s value) can create every color you can see or imagine: Raw Umber, Burnt Sienna, Cadmium Yellow, Yellow Ochre, Cadmium Red, and Alizarin Crimson. Here’s a basic color wheel using only these colors:
 Painting any subject on a white canvas distorts the subject’s values/colors. I’ve chosen medium values of mostly blue for a preliminary background. (The final background colors will be added after the under-painting of the cat is finished.)
- Choose and mix paint colors for your background.
- Thin the colors with a little water.
- Use a small brush to paint along the outer contours of Marlowe.
- Paint the entire background with a larger brush.
- Use a script liner brush and thinned white paint to “re-draw” any contour lines hidden under the background colors.

A little color is added to the ears. The next goals are to mix colors to paint Marlowe’s ears and outline her body.
Part 4: Paint Ears and Outline the Body
- Examine the various pink/red colors used to paint the inner sections of Marlowe’s ears.
- Use Cadmium Red and White to mix four or five values of pink from almost white to dark pink.
- Use Burnt Sienna and white to mix a few different light brown colors.
- Mix Burnt Sienna with a little Raw Umber to create a few darker brown colors.
- Add a little water to each color/value.
- Take your time and add a thin layer of color to both ears as shown below. (You should still be able to see faint pencil lines through the thinned paint.)
- Use a script liner brush and diluted Burnt Sienna to neatly outline Marlowe’s ears, face, and body.

